Wednesday, June 30, 2010

Sweet and Spicy Chutney


Let me start with how I thought of this chutney in the first place. My colleague N who hails from Andhra Pradesh, brought to office one day, a ginger chutney that was out of this world. Promptly I asked for the recipe and she just replied saying grind ginger, chilly and jaggery together. That inspired me to add jaggery to the next chutney I made and it so happened that we had Rava Idli's for breakfast yesterday. So it was the ideal time to try this chutney. I'll let you in on what all I used for this.

Ingredients:
  • Shallots - 15
  • Tomato - 1
  • Green Chilly - 2
  • Red Chilly - 2
  • Curry Leaves - 1 sprig
  • Corriander Leaves - 1/4 bunch (2-3 stalks)
  • Tamarind - i inch piece
  • Garlic - 10 cloves
  • Ginger - 2 inch piece
  • Jaggery - the size of a tennis ball
  • Oil - 2 tbsp
  • Salt to taste

Method


  • Heat oil in a pan.
  • Add shallots, curry leaves, green and red chillies, ginger and garlic and fry well.
  • Add tomato, salt and cook covered till the tomatoes are mushy.
  • Add curry leaves and corriander leaves and cook for another 5 minutes.
  • Cool, grind with tamarind and jaggery.

  • Add more salt if requred and serve.

Rava Idli (Semilona Idli/Pancake)


Till date I've made Rava Idli's with the ready made MTR mix that is available in the stores. This time around, I decided to try making the batter myself based on a recipe I'd read earlier in some blog. So here is how I made it.

Ingredients
  • Rava (Semilona) - 1 cup
  • Onion - 1
  • Green Chilly - 2
  • Curry Leaves - 1 sprig
  • Corriander Leaves - 1 small bunch
  • Mustard Seeds - 1 tsp
  • Split Urud Dal - 1 tsp
  • Channa Dal - 1 tsp
  • Cashew nuts - 2 tbsp
  • Oil - 1 tbsp
  • Curd (Yogurt)- 200 ml (maybe lesser, ensure the batter is not too thick or too watery)
  • Salt - to taste
Method:
  • Heat oil in a pan.
  • Splutter mustards, urud dal and channa dal.
  • When cooked, add curry leaves and finely chopped green chillies.
  • Add finely chopped onions and fry till translucent.
  • Add cashew nuts and fry them till brown.
  • Add the rava and roast till it starts browning.
  • Add corriander leaves and remove.
  • Let it cool. Add curd (yogurt) and mix well till the batter is in a slightly thick consistency.
  • Ensure the batter does not run too much, else idli's will not get cooked.
  • Set this batter for 60-90 minutes.
  • Steam in your regular idli cooker for 15-20 minutes (depends on the type of cooker you  have).
  • Garnish with shredded carrots and serve with Chutney.

Monday, June 28, 2010

Bread Masala


Let me start with a confession. I did not make this dish this time. This time around, it was my husband who made it. But I still shamelessly clicked the pictures. It makes an interesting blog entry you see.This is apparently a street food item that is sold in his native home town Manipal.

Manipal is loaded with students - it boasts of the finest medical, engineering and management schools. It is a favored destination by NRI students. Though it sounds like a sleepy hamlet, its abuzz with such kind of activities, stalls and night life. I've not yet tasted the bread masala sold on the streets, but my husband always makes a close replica (as certified by his family), so I am assuming the street food is yum as well. Here is how it is made.

Ingredients

  • Bread - 6-8 slices
  • Egg - 2
  • Onion - 1 big
  • Tomato - 2
  • Green Chilly - 2-3
  • Curry Leaves - 1 sprig
  • Mustard Seeds - 1 tsp
  • Ginger (Chopped) - 1 tsp
  • Chilly Powder - 1/2 tsp
  • Turmeric Powder - 1/4 tsp
  • Corriander Leaf - 1 handful chopped
  • Salt - to taste
  • Oil -  2 tbsp
Method:
  • Remove the sides from the bread and cut into squares
  • Beat the egg till fluffy,
  • Chop onions, tomatoes, chillies into fine pieces
  • Heat oil and splutter mustard seeds.
  • Add the ginger and green chilly and fry well.
  • Add the onions and fry till translucent
  • Add the tomatoes and cook covered till tomatoes are done.
  • Heat the dish till all the water from the tomatoes has evaporated.
  • Add the beaten egg, turmeric powder, chilly powder and salt and scramble till half done.
  • Add the cut bread slices and mix well.
  • Cook till the eggs are fully done.
  • Add chopped coriander leaves and serve hot.

Enjoy your Bread Masala! You could try variations in this by adding veggies of ur choice or Corn n Peas (My favorites). You could also try variations with the masala used - maybe chaat masala or Pav Bhaji Masala available in the market would be good as well. Not sure, haven't tried that yet!

Salsa Scrambled Eggs Salad

I

I could not think of any better name for this. I had some egg yolks remaining from the omlet I made last night. I did not have the heart to throw it. I had frozen corn and peas in my freezer. I also had a nice spicy salsa sauce. So I did the obvious - tossed them all together in Olive Oil. Added some spring onions and cilantro to it with a dash of seasoning. Thats it. Here is how I made it.

Ingredients:
  • Egg Yolk - 2
  • Sweet Corn - 1 cup
  • Peas - 1 cup
  • Salsa Sauce - 3 tbsp
  • Olive Oil - 1 tbsp
  • Paparika Powder - 2 tsp
  • Oregano - 2 tsp
  • Thyme - 1 tsp
  • Salt to taste
  • Corriander Leaves - 1 small bunch
  • Spring Onions - 2 bulbs with greens
  • Shallots - 3-4
Method:
  • Thaw the corn and peas.
  • Heat olive oil in a pan.
  • Toss the corn and peas in it.
  • Beat the egg yolk well and mix to this.
  • Add Salsa sauce, shallots, spring onions and corriander leaves.
  • Add the seasoning and salt.
  • Toss well and remove from flame.
  • You may add shredded cheese or a dollop of butter to it (I did not add this to mine)
Serve the salad hot!

Saturday, June 26, 2010

Vegetable Stew


Before I start, let me apologise for the poor quality pictures of this dish. It tastes way better than it looks, I promise! :-). I was in a hurry this morning, hence the poor quality pic. I decided in the last minute that it was Appam for breakfast. I usually have the Mangalorean Tomato Curry to go with Appams, but today, I wanted to do something different, so it was Vegetable Stew. Here is how I made it.

Ingredients:
  • Potatoes - 2 medium sized
  • French Beans - 12-15
  • Peas - 100 gms
  • Carrots - 1
  • Almonds - 2 tbsp
  • Cashew Nut - 2 tbsp
  • Khus Khus - poppy seeds - 1 tsp
  • Warm Milk - 2 tbsp
  • Onion - 1
  • Green Chilly - 3-4
  • Ginger - 2 tbsp
  • Bay Leaf - 2
  • Cinamon - 1 inch stick
  • Mace - 1
  • Curry Leaves - a handful
  • Pepper - 2 tsp
  • Salt - to taste
  • Coconut Milk (Thick, 1st pressed) - 200 ml
  • Coconut oil - 2 tsp (do not substitute)
Method:
  • Soak almonds, cashews and khus khus in warm milk. Remove the skin from the almonds and grind them to a fine paste.
  • Cut all vegetables into medium sized pieces
  • Heat oil in the cooker.
  • Add Bay leaf, cinamon and mace and fry.
  • Add chopped onions, ginger and green chilly and fry well.
  • Add the vegetables, salt and water and pressure cook for 3 whistles.
  • When done, remove the lid, add the ground almond-cashew-poppy seed paste and coconut milk and bring to boil.
  • Add salt, if required and pepper.
  • Add the curry leaves and pour 2 tsp coconut oil and remove from flame.
  • Keep covered for 15 minutes so that aroma settles.
Serve with Appam/Idiappam or Puttu.

Aloo Methi (Potatoes with Fenugreek Leaves)

This is a classic recipe - Made across India. Use of Fenugreek leaves is not so common in South India. We use the seeds frequently in our cooking though. We use the seeds for seasoning, we powder it and add it to pickles and "Thoku" - a variety of chutney that is cooked.

The name "fenugreek" or foenum-graecum is from Latin for "Greek hay". The Gujarati name is Methi (मेथी) or Methya (मेथ्या). The Kannada name is "menthya" (ಮೆಂತ್ಯ). The Tamil name for it is "Vendayam" (வெந்தயம்). The Telugu name for it is "Menti" (మెంతి). The Malayalam name is "Uluva" (ഉലുവ).In Sinhala it is called Uluhaal (උළුහාල්). (In Marathi, Oriya, Bangla, Punjabi, Urdu and Hindi it is called Methi (मेथी) (Bangla: মেথী ),(Urdu: میتھی). In Persian it is Shanbalîleh (شنبليله), and in Arabic its name is Hilbeh (حلبة).

Fenugreek seeds are supposed to be a natural coolant - When you've had very spicy food or are suffering from acidity/heart burn, you can swallow a handful of Fenugreek seeds - the relief is almost immediate. It can also be mixed in yogurt and used as a natural hair conditioner. The green leaves are used extensively in Indian Cooking. We use it to make curries, dry sujbi's and paratha's. The dried leaves, known as Kasoori Methi give a special aroma to the gravy when added. I use it very frequently in my cooking as it gives a distinct aroma.

Aloo Methi is a very simple preparation and can be had with Roti's, Poori's or bread. Here is how I made it"

Ingredients:
  • Potatoes - 3 medium (boiled and cubed)
  • Methi Leaves - 2 small bunches
  • Cumin Seeds - 1 tsp
  • Chilly Powder - 1 tsp
  • Garam Masala - 1 tsp
  • Corriander Powder - 1/2 tsp
  • Turmeric Powder - 1/4 tsp
  • Dry Mango powder (amchur) - 1/2 tsp
  • Salt to taste
  • Onion - 1
  • Ginger - 1 inch piece grated fine
  • Asafoetida - a pinch
  • Oil - 2 tbsp
  • Optional - you could add boiled sweet corn or peas to this.
Method:
  • Wash, cube and boil potatoes. You could also pressure cook it, but then it becomes too soft and gets mashed. It is better that the potato pieces are firm.
  • Wash, Clean and Soak Methi Leaves in warm water with salt and sugar for 10 minutes.
  • Remove and squeeze water.
  • In a pan, heat oil.
  • Splutter Jeera and add asafoetida
  • Add onions and ginger and fry till translucent.
  • Add methi leaves and fry well.
  • Add potatoes and mix well.
  • Add the all dry masala's and cook till the potatoes appear well fried.
  • Garnish with corriander leaves
Enjoy your Aloo Methi

Friday, June 25, 2010

Shahi Malai Kofta (Cottage Cheese Balls in a Creamy Gravy)


I made this long ago, wonder how I missed to post it. I found this in a recipe book by Nita Mehta. I usually make atleast one Paneer recipe a week. Last week, I got hold of Amul Frozen Paneer packets. I know frozen food is not good, but I find it tough to make solid Paneer at home. What I make crumbles very easily, so I use it for Burji and the likes. Amul Frozen Paneer is soft when cooked and you dont have to fry it. So I like using it. I chanced upon this recipe from the book, so I thought I'd make this. Here is how I made it:

Ingredients:
For the Kofta
  • Paneer - 200 gms (crumble well)
  • Potato - 2 medium boiled and grated
  • Peas - 1 cup boiled and mashed
  • Turmeric Powder - a pinch
  • Chilly Powder - 1/2 tsp
  • Garam Masala - 1 tsp
  • Corriander Leaves - 4 tbsp
  • Salt - to taste
  • All purpose flour (Maida) - 2 tbsp
  • Oil - for frying
  • Maida/Cornflour - for rolling the Kofta
For the Gravy
  • Cashew - 100 gms soaked in warm water
  • Yogurt (Curd) - 4 tbsp
  • Onions - 3 large or 4 medium (ground to a paste)
  • Kasoori Methi - 2 tsp
  • Green Cardamom - 3 (powdered)
  • Red Chilly Powder - 1 tsp
  • Turmeric Powder - 1/4 tsp
  • Garam Masala - 1 tsp
  • Jeera Seeds - 1 tsp
  • Paneer pieces - 2 tbsp
  • Salt to taste
  • Milk - 1 cup
  • Cream - 100 gms
  • Oil - 2 tbsp
Method:

For the Kofta
  • Mix all the ingredients together.
  • Roll into round balls.
  • Roll these balls in flour.
  • Fry them in oil and set aside.
For the Gravy
  • Powder cardamom. Grind the onions to a fine paste.
  • Grind the cashews along with curd (yogurt) and set aside.
  • Heat oil in a pan. Add the cumin seeds and fry.
  • Add the ground onions and powdered cardamom.
  • Cook till the raw smell disappears and the onion paste is fully cooked.
  • Add the kasoori methi, red chilly powder, turmeric powder, salt and garam masala and cook well.
  • Add the paneer pieces.
  • Add the cashew and yogurt paste and cook well
  • Take off flame and cool.
  • When it is fully cooled, add 1 cup milk and place on low flame.
  • When the gravy is warm enough, add the cream and cook on low flame till the first bubble is about to appear.
  • Turn off before the first bubble appears.
  • Place the Kofta's in the gravy and keep covered.

Potato Subji (Masala for Poori-Masala or Masala Dosa)


This is the simplest preparation and probably the first dish I made after my marriage. This goes well with Roti's and Poori's and can also be used as the stuffing for Masala Dosa. It is a dry subji, so we usually make it while travelling - atleast spares us the worry of having the gravy spill all over. It is very handy when you have to pack lunch or tiffin for school and office goers. Just roll it inside the roti or poori or stuff it inside a dosa. Here is how I made it.

Ingredients
  • Medium sized potatos - 3
  • Onion - 1
  • Green Chilly - 3
  • Mustard Seeds - 1 tsp
  • Split Urud Dal - 1 tsp
  • Channa Dal - 1 tsp
  • Curry Leaves - 1 sprig
  • Turmeric Powder - 1/4 tsp
  • Grated Ginger - 1 tsp
  • Asafoetida - 1 pinch
  • Salt - to taste
  • Oil - 3 tsp
  • Corriander Leaves - for seasoning
  • Optional - you could use peas or other vegetables that are boiled well. You could also use 1 tomato if you like that flavour.
Method
  • Wash and pressure cook the potatoes.
  • Cool, Peel and mash them well.
  • Cut onions into small pieces.
  • Heat oil in a pan.
  • Splutter Mustard seeds and add the curry leaves.
  • Add channa dal and cook till brown.
  • Add the urud dal and cook till brown.
  • Add the onions, green chillies and asafoetida powder and stir fry till translucent.
  • At this stage you could add the tomato, peas or other veggies you want to add.
  • Add salt and turmeric powder and mix well.
  • Now add the mashed potatoes and mix well so that the masala and potato mash mixes well.
  • Garnish with corriander leaves and serve.
And that is it... Enjoy your Poori or Roti or Dosa with this simple recipe and preparation.

Brinjal - Bell Pepper Masala


We are forced to have chapathi's/roti's for dinner almost every night, as that is the only thing I can make in the morning and leave to find it palatable when I return from work. Thereby I am tasked with the challenge of preparing something different and new almost every day. Well, sometimes all I do is have the same base and change the veggies. This is one such preparation.

Ingredients
  • Green Brinjals - 5-10 (Use the green ones for this, else your dish looks too colorful)
  • Capsicum (Green Bell Pepper)
  • Onion - 2 chopped into small pieces
  • Tomato - 2 chopped into small pieces
  • Ginger-Garlic Paste - 2 tsp
  • Red Chilly Powder - 2 tsp
  • Turmeric Powder - 1/4 tsp
  • Corriander Powder - 1 tsp
  • Garam Masala - 1 tsp
  • Cumin Seeds - 1 tsp
  • Asafoetida - a pinch
  • Fenugreek Powder - 1/2 tsp
  • Everest Channa Masala - 3/4 tsp
  • Salt - to taste
  • Oil - 3 tsp
  • Corriander Leaves - to garnish
Method
  • Wash and slit capsicum and remove the pith. Cut into long pieces.
  • Wash, clean and chop the Brinjals lengthwise
  • Heat oil in a pan.
  • Splutter Cumin Seeds.
  • Add Asafoetida powder and fry.
  • Add the onions and fry till translucent.
  • Add the ginger garlic paste and fry till the raw smell goes away.
  • Add the tomatoes and cook it with the lid covered on low flame till the tomatoes become mushy.
  • Now add the dry masala's (Except the Channa Masala - Red Chilly, turmeric, corriander, fenugreek and garam masala's)
  • Fry well and add salt to taste.
  • When the masala is done and the aroma spreads, add the brinjal and sprinkle a little water.
  • Let it cook well.
  • Dry the water, add the bell pepper and cook till done.
  • Garnish with Corriander Leaves.
Try it once for your roti's. It's a change!

Thursday, June 24, 2010

Chinese Roti's


Yet another one from my left over make over series. Some one is having very little dinner - I practically have left over roti's every day. I know I'm not the one eating any lesser, so it probably has to be my husband. Well, I take efforts to feed him those roti's in yet another form. This time my attempt was at a Chinese variation. Just tore the roti's into small pieces, tossed it in a couple of sauces and it was ready... really, you have to believe me.

Ingredients
  • Left Over Chapathi - 2/3 (obviously fresh ones are better)
  • Onion - 1
  • Green Chilly - 2 slit lengthwise
  • Ginger - 1/2 inch piece, chopped into small pieces
  • Garlic - 3 cloves chopped
  • Soya Sauce - 1 tblsp
  • Chilly Sauce - 2 tsp
  • Tomato Ketchup - 2 tsp
  • Any other sauce/seasoning you prefer
  • Oil - 2 tsp
  • Salt to taste
Method
  • Tear the roti's into small pieces
  • Heat oil in a wok
  • Add garlic pieces and fry till smoked
  • Add onions, chilly and ginger and stir fry.
  • Add Soya Sauce, Chilly Sauce, Tomato Ketchup and othe sauces
  • Mix well, add salt.
  • Finally add the pieces of roti's you tore apart.
  • Toss well and serve.
This is not something great or yummy - Just a change from the regular roti's we have and a good way to not waste left over food.

Wednesday, June 23, 2010

Egg Roll

This is pure left over make over. I had no clue what I was going to prepare for breakfast this morning. I was done with my Idly/Dosa batter, tired of Maggi/Foodles and wary of Upma. I had no clue what I wanted for breakfast either. Cornflakes and Oats are always alternatives and I ensure that I stock them up at home, but then I was in no mood for either of them.

I remembered then that I had some Chapathi's left over from last night. All I could think of then was an egg roll. I've lived for 6 years in Kolkata. My taste buds are honed to the aroma and taste of the Bengali Cuisine. Egg roll is hardly a Cuisine. It is more of a fast food, available at literally every street corner in Kolkata. The rolls in  Kolkata are made with mustard oil. That is something I do not use in my kitchen. Hence I made this with normal cooking oil.I vaguely remember insisting that my dad and uncle who lived with us then had to bring 1 egg roll each when they returned home. Ever since the Tibbs Frankie carts have started in Chennai, my orders would have atleast 1 egg frankie. When I last went to Kolkata for my cousin's wedding 3 years ago, my agenda had only one thing - EGG ROLL. Pity Me....I had a bad stomach and so could not relish the original Kolkata Egg Roll.


Here is how I made this morning's Egg Roll.

Ingredients
  • Left over Chapathi's/Roti's - 2 (You could use freshly made roti's - that would obviously taste better)
  • Egg - 1
  • Onion - 1 chopped into small pieces
  • Green Chilly - 1 chopped finely
  • Salt - to taste
  • Pepper Powder - as per taste
  • Paparika Powder - as per taste
  • Oil - 2 tsp
Method
  • Beat the egg well with salt and set aside.
  • Heat iron girdle/pan on high flame.
  • Add 1 tsp oil and when it becomes hot, place 1 chapathi/roti over it.
  • Toss twice almost quickly. You need to do this so that it becomes warm on all sides without browning further.
  • Pour 1/2 the beaten egg onto the Chapathi/Roti.
  • Turn the stove to low flame.
  • Place 1/2 the chopped onions and chillies on the egg mixture
  • Sprinke pepper powder and paparika powder
  • Turn over so that the egg, onion and chillies are placed on the girdle.
  • Cook for 2-3 minutes till the egg gets cooked.
  • Remove from girdle and roll it up. Place something heavy on it as soon as it is rolled so that it retains its shape.
  • Repeat for the other chapathi/roti with the remaining half of the ingredients.
  • Your Egg Roll is ready!

Monday, June 21, 2010

Malabar (Kannur) Style Kootu Curry

Kootu Curry is a dry accompaniment and a must have in any typical mallu "Sadhya" (Feast). We prepare it for weddings, birthdays, Onam, Vishu and just about every other occasion. This used to be one of the first items served (there is an order for serving the Kerala Sadhya Items apparently) after the Thoran (called Upperi in our part of Kerala). Impatient as I was and still am, I would start eating the Kootu Curry without waiting for the rice to be served even. I realised that I was not the only one who did so. There were so many cousins and relatives and friends who apparently did the same - why wouldn't we do it,when the curry tastes delicious.
I made this for lunch a week ago and I was satisfied with the result. So here goes the recipe.

Ingredients:

  1. Black Channa (Chickpeas/Kadala) - 2 cups
  2. Yam - 200 gms (cut into small cubes)
  3. Raw Plantain - 1 (cut into cubes)
  4. Coconut - 1/2 shell, grated
  5. Cumin (Jeera) Seeds - 2 tsp
  6. Turmeric Powder - 1/4 tsp
  7. Chilly Powder - 2 tsp
  8. Red Chillies - 3
  9. Urud Dal - 1 tsp
  10. Mustard Seeds - 2 tsp
  11. Coconut Oil - 2 tsp
  12. Curry Leaves - 2/3 sprigs
  13. Peppercorns - 1-2 tsp (as per your requirement)
  14. Green Chillies -1 or 2 (You could use either the green chilly or pepper corn, don't use both)
  15. Salt - to taste
Method
  1. Soak the Black Channa overnight.
  2. Next morning, pressure cook it for 3 whistles with a little bit of salt.
  3. Wash and cut yam and plantain into small cubes.
  4. Cook them in 1/2 cup water along with turmeric powder, salt and chilly powder till soft.
  5. Set aside 2 or 3 tsp of grated coconut.
  6. Grind the rest with Cumin Seeds and peppercorns (or green chillies).
  7. Add the black channa to the cooked yam and plantain and evaporate the water. This is a completely dry dish. There should be no running gravy
  8. Add the ground coconut mixture and cook well.
  9. Heat coconut oil in a small frying pan.
  10. Splutter mustard seeds, add the urud dal, red chilly and curry leaves and season the prepared curry with this.
  11. Finally, fry the 2-3 tsps of grated coconut that you had set aside and add it to the curry. 
  12. Your Kannur Style Kootu Curry is ready.

Sunday, June 20, 2010

Karela Masala (Bitter gourd Masala)


I tasted this recipe from office. My colleague P and boss S used to bring it -  a typical Punjabi preparation they said. But the best part of it was that it did not taste like Bitter gourd, or so I thought, till I actually saw the pieces to believe it.

The knack lies apparently in choosing succulent young Karela's (Bitter Gourd). I obviously do not know how to do that. So I leave that to chance. The next step apparently is to prepare the Karela for this dish. Lets see how it is done:

Ingredients

  1. Karela (Bitter Gourd) - Young and Tender - 3-4
  2. Onions - 3
  3. Potato - 1 boiled (optional) - I did not use this, but then this is a good to have item in this preparation
  4. Ginger Garlic Paste - 1 tsp
  5. Red Chilly Powder - 1 tsp
  6. Corriander Powder - 1 tsp
  7. Turmeric Powder - 1/4 tsp
  8. Fennel Seeds Powder (Saunf) - 2 tsp
  9. Dry Mango Powder (Amchur) - 2 tsp
  10. Kasuri Methi - 2 tsp
  11. Garam Masala - 1 tsp
  12. Salt - to taste
  13. Sugar - 1 tsp + 2 tsp
  14. Jeera - for seasoning
  15. Oil - for tying
  16. Thread - for tying the Karela together
Method
  1. Wash the Karela, grate its uneven outer skin (Do not peel it entirely)
  2. Make a vertical slit, taking care not to cut it into 2 pieces.They should still remain joint.
  3. Dry well and rub Salt outside and inside the slit Karela.
  4. Leave overnight.
  5. Wash and Dry the Karela the next morning.
  6. You could also rub salt and set aside for 1-2 hours. By keeping it overnight, you are letting the vegetable absorb the salt - this also helps in reducing the bitter taste of the vegetable.
  7. Grind together - 1 Onion, Ginger-Garlic Paste, Chilly, Turmeric, Corriander Powders, Garam Masala, Saunf Powder, Amchur powder, Kasuri Methi, Salt and Sugar to a fine paste without adding any water.
  8. Set aside 3-4 tablespoons of this masala (or even more if you wish so)
  9. Stuff this preparation inside the slit Karela's (You could mix the boiled and mashed potato or other veggies at this stage). Optionally, you could also cook small onions in this masala and stuff them inside the vegetable, but it becomes a tad bit tedious.
  10. Tie the vegetable with thread and shallow fry them till all sides are cooked.
  11. Drain, set aside, remove the thread and cut them into 2 inch pieces.
  12. Heat the remaining oil (from shallow frying the Karela) and add Jeera.
  13. Cut the remaining 2 onions and fry them well.
  14. Add the ground masala that you have set aside and fry till onions turn brown and the raw smell of the masala goes away.
  15. Add 2 tsp sugar to this mixture. 
  16. Add salt to taste.
  17. Add the cut Karela pieces and fry till it is completely dry,
  18. Serve hot with Roti's and Rice


Saturday, June 19, 2010

Olan - A Kerala Sadhya Item


This is one of the Keral Sadhya items. I've always loved having it as a child. Loaded with coconut milk and tenderly cooked vegetables and lentils, this dish was always an accompaniement. Here is one picture that I found on the internet showing the placement of items for a Kerala Sadhya and the white dish you notice right on top is Olan.


I've never made a full fledged Sadhya on my own. I've been spending every Vishu with my in-laws and Onam with my parents. This time I had decided to make my own Onam Sadhya. So I was testing waters before I actually made it.And I was pretty pleased with the result. Oh yeah, that was primarily because I added really thick coconut milk. It enhanced the flavor of Olan, but then I must admit, it made the dish unhealthier than it was supposed to be.

The pristine beauty of Kerala Cuisine (atleast in my part of Kerala) is that very little oil is used. Most of the dishes are prepared by boiling the vegetables/fish and then adding coconut  milk/paste. Dieticians generally ask us to avoid coconut, but I've rarely seen obese Keralites among the ones who have exclusively eaten Kerala food all their lives.

I was reading up on Coconuts, only to be absolutely surprised to realize that India is only the third largest producer of Coconut. Philippines is apparently the largest producer, followed by Indonesia. I laugh at my ignorance as I strongly opined that only South Indians and Thai's used coconut in their cooking, hence India and Thailand would be the only two producers of Coconut.

Well, coming back to my Olan, here is how I prepared it -

Ingredients:
  1. Black eyed Beans (Mampayar, Lobia) - 1 cup (Soak Overnight)
  2. Raw Plantain - 1
  3. White Pumpkin - 200 gms (skin peeled and diced into squares)
  4. Thick Coconut milk - 300ml (1.5 cartons or maybe 2, depending on your taste)
  5. Green Chilly - 2
  6. Curry Leaves - A handful
  7. Coconut Oil - 2 tsp (Do not substitute)
  8. Salt - to taste
Method
  1. Pressure cook/boil till tender the beans.
  2. Cut raw plantain in cirles. Boil them with little salt.
  3. Boil separately white pumpkin till cooked.
  4. Combine all three together, add a little water and slit green chillies and bring to boil.
  5. When the water has boiled enough, add salt if required and then the coconut milk,
  6. Allow it to boil well till the vegetables soak in the taste of the coconut milk.
  7. Add curry leaves, coconut oil and remove from flame.
  8. Keep covered for 30 minutes for the aroma to settle.
  9. Mix well before serving.

Friday, June 11, 2010

Paneer Chatpata (Cottage Cheese in tangy tomato base)


By now you must have all guessed how much of a Paneer freak I am. I can have Paneer for every day of the week and still not get tired of it. Paneer is easy to make at home, thus reducing the dependancy on departmental stores. Most of the cottage cheese in packets that we buy from outside are sour by the time you cook them. Amul Frozen Paneer is good though, and I have kept it for 2 weeks and it still was soft when cooked. Obviously that also means that a good amount of preservatives have been added. I tried Hatsun Paneer very recently and that was soft and not sour too.

The best way to make paneer is at home. Boil milk and as it rises, add lemon juice, curd or vinegar to curdle it. Strain the water and collect the paneer. You could use the scrambled form to make Paneer Burji or hang it in a muslin cloth to drain and then roll it tightly into a shape that you could cut later.

Paneer Chatpata is christened by me. I learnt this recipe from my friend J's mom. She just called it Paneer Subji. But then I thought it was boring to post a recipe for Paneer Subji. I also have made some variations to her recipe (a.k.a - add peas and tomato puree, cook in refined oil instead of vanaspati). I'll tell you how to make it.


 Ingredients
  1.  Paneer - 300 gms
  2. Onions - 5-6
  3. Tomatoes - 7-8
  4. Ginger Garlic Paste - 2 tsp
  5. Jeera - 1 tsp
  6. Chilly Powder - 1 tsp
  7. Dhania Powder - 1 tsp
  8. Turmeric Powder - 1/4 tsp
  9. Garam Masala - 1 tsp
  10. Salt to taste
  11. Oil/Vanaspati - 3-4 tblsp
  12. Green Peas (Optional) - 1 cup
  13. Channa Masala (Optional) - 1 cup
  14. Cashew paste (optional) - 3 tblsp
  15. Cream/Milk (optional) - 1 cup

Method
  1. Grind the onions and tomatoes to a fine paste without adding water.
  2. Fry the Paneer pieces in oil/ghee (optional)
  3. Heat Vanaspati/Oil in a pan and splutter jeera.
  4. Add the ground onion-tomato paste & ginger garlic paste and let it cook till the water evaporates. You could keep it covered so that it does not splutter all over your kitchen walls.
  5. Add turmeric, chilly and corriander powders and channa masala (if you are using it ) and cook till it becomes completely dry.
  6. Add salt, paneer, peas (if you are using it), cashew paste (if you are using it) and mix well.
  7. Leave on low flame for the spices to mix with Paneer.
  8. This is ready to be served as it is. In case you want a little more gravy consistency, you could add i cup of cream or milk.
  9. If you are adding cream or milk, wait till the above dish is completely cooled and then mix it.
  10. Place it back on the stove after mixing and cook on low till it is about to boil and take off from the gas stove.

  Note: This dish is best had when it is completely dry. You could roll it inside roti's and pack as a roll for lunch. Easy when you are travelling, you wouldn't have to worry about spilling gravy or having a messy lunch.


Try making this, you could try variations like adding methi, potatoes etc instead of paneer. The whole essence of this dish is that it is prepared without a drop of water.

Tastes yummy. Thank you J aunty for this wonderful recipe.

Try it and have fun.

Poricha Kootu

I don't know how this recipe got its name, but I was in love with it the first time I tasted it. My memory fails me as I have forgotten my tryst with this dish in school. The earliest I remember was having it from my colleague M when I was pregnant. Oh Boy, did I love it!!! M, being the kind soul she was ensured she got this for me regularly... this is the nicest part of being pregnant... people are eager to satiate your pregnancy cravings. M got it every other week for me. It's nearly 3 years now since this incident but the taste lingered on.

Recently I decided to ask my best friend G the recipe. I figured since it is a Tamil Brahmin speciality, G would know the recipe too...so what if M was an Iyer and G an Iyengar? The recipe ought to be the same right? G laughed and told me "DO you remember how you used to hog my lunch in school every time my mom packed this dish for me?". My jaw dropped, limbs dragged and the whole body shook!!!! Haha, let me not overdo, but I swear, I really did not remember having this dish earlier. G says she can recall very vividly how I used to exchange the Fried Rice my mom packed for me in exchange for her Poricha Kootu n Rice. I must have forgotten about it in my growing old years, but more than 10 years later, when M brought the dish, I loved it...so I guess the taste was cultivated when I was a 13 or 14 year old teen!

G gave me the recipe which I cross verified online. Fairly simple. So I decided to make it. And relish it!!!!


What you need to make Poricha Kootu

Any of the following veggies (any 2 would suffice)
  • Chow Chow (I don't know its english name) - 1
  • Green Brinjal - 5-6 cut lengthwise
  • Green Capsicum - 1
  • Kovakkai (Ivy Gourd or Tindora) - 100 gms
  • White Pumpkin - 100 gms

  1. Moong Dal (Siru Parippu) - 1 cup
  2. Channa Dal (Kadala Parippu) - 50 gms
  3. Coconut - 1/2 shell grated
  4. Jeera - 1 tsp
  5. Green Chillies - 3-4
  6. Peppercorn - 3-4 tblsp
  7. Turmeric Powder - 1/4 tsp
  8. Sambar Powder - 1 tsp
  9. Salt to taste

How to make it:
  1. Pressure cook the Moong Dal and Channa Dal for 3-4 whistles.
  2. Cut and boil the vegetables in water with turmeric and sambar powder.
  3. Grind the coconut, green chilly, peppercorns and jeera into a fine paste.
  4. When the veggies are cooked and soft, add the dal and bring to boil.
  5. Add salt and mix well.
  6. Add the ground coconut-peppercorn paste and cook till the gravy becomes thick.
  7. Serve with hot rice and ghee!

This dish requires no oil. Yeah the coconut is a high cholestrol item, but still, NO OIL!!!!

I love this dish and looks like this is going to feature in my weekly timetable for lunch menu from now on since I've learnt to make it.

Wednesday, June 9, 2010

Arbi-Aloo Stuffed Paratha

 This again is not rocket science. I had left over masala from the Kofta's in the previous recipe, hence I thought I'd make this dish.

 Ingredients:

For the Filling
  1. Baby Potatoes - 250 gms
  2. Colocassia (Arbi/Yam/Sepankazhangu/Chembu) - 150 gms
  3. Corriander Leaves - 1 bunch
  4. Chilly Powder - 1 tsp
  5. Corriander Powder - 1 tsp
  6. Turmeric Powder - 1/4 tsp
  7. Dry Mango Powder - 1 tsp
  8. Garam Masala - 1 tsp
  9. Cumin Powder (Jeera Powder) - 1 tsp
  10. Asafoetida (Hing) - 1 pinch
  11. Salt to taste

For the Paratha
  1. Wheat Flour - 2 cups
  2. All purpose flour (Maida) - 1/2 cup
  3. Salt - 1/2 tsp
  4. Oil - 1 tsp
  5. Luke Warm Water - as required
  6. Oil/Ghee/Butter - for preparing the paratha

My Stuffed Paratha

Method:

For the Filling:
  1. Boil potatoes and colocassia (Pressure cook for 3-4 whistles)
  2. Cool and Peel skin.
  3. Mash them well.
  4. Add the remaining masalas and corriander leaves and mix well.

For the Paratha
  1. Mix all ingredients to get a fine dough. It should be soft, yet not sticky.
  2. Set aside for 1 hour.
  3. Roll into small balls.
  4. Flatten one, spread it on some flour and roll to the size of a Poori (around 8 inches diameter)
  5. Take 2 tblsp of the filling, place it in the middle and close from all sides. This would look like a small money purse now.
  6. Flatten gently, roll into some loose wheat flour and roll the paratha like a regular roti.
  7. Keep dusting wheat flour on both sides because the colocassia in the filling tends to make it sticky.
  8. Heat girdle and place on it.
  9. Add oil/ghee/butter and turn over when it browns. Do not let it become stiff or too dark. It would become stiff if the girdle is too hot.
  10. Keep repeating till all sides are cooked.
  11. Serve with a dollop of butter.

Palak Kofta (Spinach with Patties)

I could not get a better pic!
This is basically another idea spurned by left overs. As I have mentioned earlier, my dear husband is not too fond of Colacassia or Baby Potatoes and I had a packet of each staring at me this morning. I thought I'd make Kara Kuzhambu with one veggie and fry the other...In fact I was pretty much dreading my husband's response.

Suddenly the bell rang and as if she were god sent, it was the lady who sells greens to our apartment. And again, as if it was serendipity, she had Palak (Spinach). I usually buy Spinach when I have Paneer (Cottage Cheese) and resort to making the usual Palak Paneer. This time I decided to use the Baby Potatoes and Yam (Colocassia) instead. Again the dilemma was on - Should I boil the potatoes/yam and place it in the Palak Gravy instead of the Paneer or do something else. The wise part of me told me to try something else - It was pretty obvious that my husband would keep aside the 2 veggies that he does not like and then complain that I never make anything he likes (Which is 75% true - I make things that excite me, sometimes I am inconsiderate about his dislike for the same).

I decided to camouflage the 2 veggies that I was planning to use. And thus Palak Kofta was born! Try it out. It is not too different from the Palak Paneer Recipe that I usually make.

 Ingredients:

For the Kofta
  1. Baby Potatoes - 250 gms
  2. Colocassia (Arbi/Yam/Sepankazhangu/Chembu) - 150 gms
  3. Corriander Leaves - 1 bunch
  4. Chilly Powder - 1 tsp
  5. Corriander Powder - 1 tsp
  6. Turmeric Powder - 1/4 tsp
  7. Dry Mango Powder - 1 tsp
  8. Garam Masala - 1 tsp
  9. Cumin Powder (Jeera Powder) - 1 tsp
  10. Asafoetida (Hing) - 1 pinch
  11. Salt to taste
  12. Cornflour - 1 cup
  13. Oil - for shallow frying

For the Palak
  1. Spinach (Palak) - 2 or 3 bunches (I use only the leaves - I got one small cooker full of uncooked leaves)
  2. Onions - 2
  3. Tomatoes - 3
  4. Green Chilly - 3
  5. Ginger Garlic Paste - 1 tsp
  6. Jeera - 2 tsp
  7. Hing- 1 pinch
  8. Milk - 200 ml (you could use cream instead)
  9. Chilly Powder - 1 tsp
  10. Turmeric Powder - 1/4 tsp
  11. Garam Masala Powder - 1 tsp
  12. Salt to taste
  13. Oil - 2 tblsp
  14. Spinach Stock - 1 cup (The water that is left after boiling/steaming the Spinach)

Method:

For the Kofta:
  1. Boil potatoes and colocassia (Pressure cook for 3-4 whistles)
  2. Cool and Peel skin.
  3. Mash them well.
  4. Add the remaining masalas (other than cornflour) and corriander leaves and mix well.
  5. Take a small amount of the mashed paste and flatten them on your palm like a patty.
  6. Roll it in cornflour.
  7. Heat oil in a pan.
  8. Shallow Fry the patties. (I make them in batches - roll 10 patties and then shallow fry all of them together)
  9. Turn over once side is done.
  10. Remove from pan and drain excess oil by placing the kofta's on a tissue paper.

For the Palak Gravy
  1. Steam Palak well (Do not boil them). I used the leaves and discarded the stems. You can use both if you want a good quantity of the gravy.
  2. Set aside the stock if you want to add it to the gravy.
  3. Set aside to cool
  4. Heat oil in a pan.
  5. Splutter half of the jeera and fry the onions till translucent.
  6. Add ginger garlic paste and fry till the raw smell goes.
  7. Add green chillies and tomatoes and cook till the tomatoes turn mushy.
  8. Remove and set aside to cool.
  9. Once cooled, puree the palak and the prepared onion-tomato mixture together into a fine paste.
  10. Heat oil in a pan.
  11. Splutter remaining jeera, add the hing (asafoetida)
  12. Add the pureed mixture and mix well.
  13. Add Spinach stock.
  14. Add turmeric powder, salt and chilly powder and bring to boil.
  15. Add garam masala and kofta and allow it to boil once.
  16. Remove from flame and add the milk/cream.
  17. Place it back on low flame and cook till it is about to boil. Do not bring it to boil as the milk/cream will curdle.
  18. Do not cook for too long as the Kofta's will become soggy and get mashed into the gravy.
  19. Serve hot with roti's/parantha's
Finally, this is a pic taken from the internet, sent by my friend G - This is how a Palak Kofta should actually look :-)

Monday, June 7, 2010

Methi-Matar-Makkai-Malai (Fenugreek-Peas-Corn in Cream)

I'd prepared this long back based on a recipe from a Sify eBook that I'd downloaded. I completely forgot about this preparation and the recipe till I opened my fridge to find all the ingredients staring at me. I found the e-Book in my old hard disk that had all but died.

Ingredients

  1. Methi Leaves - 2 small bunches

  2. Corn - 1 cup

  3. Frozen Peas - 1 cup (They cook well and do not run color like the other varieties available)

  4. Kasoori Methi -  1 tblsp

  5. Jeera - 1 tsp

  6. Asafoetida - 1 pinch

  7. Green Cardamom - 2

  8. Cloves - 4-5

  9. Cinamon Stick - 1 inch piece

  10. Onions - 2 big

  11. Green Chilly - 4-5 (as per your spice requirement)

  12. Cashew Nuts - 1 tblsp

  13. Poppy Seeds (Khus Khus) - 1 tsp

  14. Sugar - 1 tsp

  15. Ginger - 1 inch piece

  16. Curd - 2 tblsp

  17. Malai - 200 ml tetra pack carton

  18. Oil - 2 tblsp


Method

  1. Soak Methi in salted hot water for 15 minutes

  2. Soak cashew nuts in warm water.

  3. Thaw Corn and Peas (I microwaved for 2 mins)

  4. Dry Grind cardamom, cinamon and cloves and set aside.

  5. Grind cashews and khus khus together.

  6. Add ginger, garlic, curd, onions and sugar to the paste and gind again.

  7. Heat oil in a pan.

  8. Splutter Jeera and add asafoetida.

  9. Add ground paste and powder and fry till the raw smell disappears.

  10. Add corn, peas and methi and mix well.

    [caption id="attachment_131" align="alignright" width="300" caption="Methi Matar Makkai Malai"]Methi Matar Makkai Malai[/caption]


  11. Add salt, kasoori methi and a little water and allow to boil.


  12. Beat Malai well and add to the gravy.


  13. Boil till it thickens and serve


  • [caption id="attachment_132" align="alignleft" width="300" caption="Finally made!"]Finally made![/caption]


Sunday, June 6, 2010

Malabar Egg Biriyani

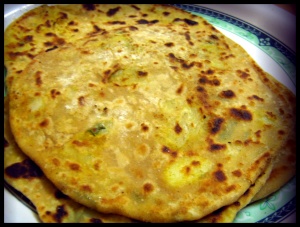
Biryani.... I think it is to do with Malabar Mallu's! I've seen my grandmother drool over Biryani at this age. I know of no wedding/birthday celebration in our part of the world without a "Biryani Party". Though I am not too fond of the Nei Chor (Ghee Rice) that is served, the Biryani is yummilicious!!!! The Calicut Moplah Biryani or Thalassery Biryani finds a mention in wikkipedia as well.

I found this recipe on Mishmash's site (Egg Biryani Finally Makes It to the Hall of Fame). I was not as patient as her, so I probably tried a few shortcuts and omitted a few items. The end result however was appreciated, more so, considering that this is the first time I am making Malabar Style Biryani (My grandmother and mum in law make the yummiest Chicken Biryani...will post that recipe some time soon.)

Right now, it is Malabar Egg Biryani, Thanks to Mishmash. Now, you may wonder why I would want to write down the whole recipe here instead of just directing the link to her site. Well, it is purely for my reference purpose - When I want to make the dish the next time, I wouldn't have to search for it... I'd have it in my own collection here. So here goes the ingredients and the method.


Step 1: Biryani Masala

Ingredients:

  1. Black Cardamom - 1 (Not in the original recipe, I had it, so I added it)

  2. Green Cardamom - 1

  3. Cloves - 5-6

  4. Cinamon - 2 inch stick

  5. Star Anise - 1 (Not in the original recipe, I had it, so I added it) 

  6. Saunf - 3/4 tsp

  7. Jeera - 3/4 tsp

  8. Nutmeg - 1/4

  9. Nutmace - 1

  10. Caraway Seeds - 1/4 tsp (I did not have this, hence I did not add it)


Method:

  1. Dry grind all the ingredients together. I read in another recipe that you could dry roast them first, but I was scared of burning them, hence I powdered them without dry roasting.


Step 2 -  Chilly-Garlic-Ginger Paste

Ingredients:

  1. Green Chilly - 10

  2. Garlic - 15 cloves

  3. Ginger - 2 inch piece


Method:

  1. This one aint rocket science. Grind all of them together into a fine paste without adding water.


The original recipe does not go in this sequence,but I did this just to spare me the misery of going through a power cut at the most crucial time. I finished all the grinding early in the morning so that even if the power gets cut by mid morning, my biryani would be ready by lunch.

Step 3 - Making the rice

Ingredients:

  1. Basmati Rice - 2 cups

  2. Water - 4 cups

  3. Ghee - 4 tblsp

  4. Ground Chilly-Ginger-Garlic Paste- 1 tblsp

  5. Onion - 1 finely chopped

  6. Bay Leaf - 2

  7. Green Cardamom - 4-5

  8. Cloves - 5-6

  9. Jeera - 1 tsp

  10. Salt - 1 tsp


Method:

  1. Wash and drain rice

  2. Heat Ghee in the pan

  3. Splutter Jeera seeds.

  4. Add bay leaf, cinammon and cardamom to this.

  5. Fry for some time.

  6. Add onions and fry till they turn translucent

  7. Add 1 tablespoon of the ground ginger-garlic-chilly paste.

  8. Fry till the raw smell disappears.

  9. Add basmati rice and fry till all the water has evaporated.

  10. Add salt and mix well.

  11. Add 4 cups of water (same measure cup as rice) and bring to boil.

  12. Reduce flame to sim and cover cooked till the rice is almost done and the water has evaporated completely


Note: At this stage, the rice may seem half cooked. It is okay, because you are going to let it cook more with the masala (Dum Style)

Step 4 - Making the Egg

Ingredients

  1. Eggs - 4 for making the omelet

  2. Eggs - 4 hard boiled

  3. Onion - 1 chopped into small pieces

  4. Green Chilly - 1 cut into small pieces

  5. Salt to taste

  6. OIl - 2 tsp

  7. Biriyani Masala (refer step 1) - 1 tsp

  8. Turmeric Powder - 1/4 tsp

  9. Chilly Powder - 1 tsp

  10. Oil - 3 tblsp for shallow frying the hardboiled eggs.


Method:

  1. Beat 4 eggs till soft and fluffy.

  2. Add salt, onions and green chilly and mix well.

  3. Heat a pan.

  4. Add 1 tsp oil and pour 1/2 the mixture.

  5. Reduce flame to avoid it getting burnt.

  6. Turn side over and remove when it is done on both sides.

  7. Repeat for the next omelet.

  8. Shred the omelet into fine pieces.

  9. Hardboil the remaining 4 eggs.

  10. When cooled, remove the shell and cut into 2.

  11. Add 1 tsp Biriyani Masala, 1/4 tsp turmeric, 1 tsp red chilly powder and salt and shallow fry them.

  12. Set aside.


I omitted the hardboiled eggs bit because it was an egg overdose for us today. We had Spanish Omelet for breakfast as well, so I thought it would be wise to do away with the hardboiled eggs this time.

 Step 5 - Making the Egg Masala

Ingredients

  1. Onions - 3-4

  2. Tomatoes - 3

  3. Biryani Masala (from Step 1) - 2 tblsp

  4. Ground Chilly-Garlic-Ginger Paste (from step 2) - 2-3 tblsp

  5. Ghee - 4-5 tblsp (You could substitute it with oil)

  6. Salt to taste

  7. Mint - 1 cup chopped

  8. Corriander Leaves - 1 cup chopped

  9. Thick Curd (Yogurt) - 3 tblsp

  10. Lime Juice - from 1 big lemon or as per taste

  11. Shredded Egg Omelet (from step 4)


Method

  1. Heat ghee in a pan

  2. Add onions and fry till translucent

  3. Add the ground chilly-garlic-ginger paste and fry till the raw smell disappears

  4. Add tomatoes and cook till mushy.

  5. Add the dry powdered Biryani Masala and mix well.

  6. Add mint, corriander leaves and shredded egg and mix well.

  7. Add lemon juice and salt to taste and mix well.

  8. Add yogurt and mix well.

  9. Bring to boil.

  10. Turn off flame after 1 boil (else the yogurt will separate)

  11. You could test the salt now and adjust accordingly.


This step gets over very quickly as you don't have to wait for any vegetable to get cooked. The time taken is for the onions and tomatoes to get cooked and become a semi-gravy consistency.

Step 6 - Mixing the Biryani

Method: (This whole step should be done on a low flame)

  1. Heat Ghee in a pan

  2. Layer with one serving of rice prepared earlier. (Step 3)

  3. Top with one layer of egg masala. (Step 5)

  4. Sprinkle Biryani Masala. (Step 1)

  5. Repeat this once again.

  6. Place hardboiled and shallow fried egg halves (Step 4).

  7. Cover with lid and ensure that no vapor escapes the pan.

  8. Keep in sim for 20-30 minutes. Ensure that the rice does not get burnt. Depending on how cooked/uncooked the rice is, this time could vary from 15 minutes-30 minutes.


Step 7- Making the Garnish

Ingredients

  1. Onions - Sliced into thin long pieces

  2. Cashew nuts - 2-3 tblsp

  3. Raisins - 2-3 tblsp

  4. Ghee - 4-5 tblsp


Method:

  1. Heat Ghee and deep fry each of the above separately till it turns blackish brown.


Step 8 - Finally the Biryani is ready

  1. Remove the biryani from the stove and mix it well.

  2. Take care to ensure that you do not crumble the hardboiled eggs (You could also add it at this stage if you dont want to disturb them too much.)

  3. Sprinkle the garnish.

  4. Serve!

    [caption id="attachment_126" align="alignright" width="300" caption="Malabar Egg Biryani"]
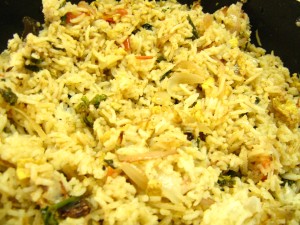
Malabar Egg Biryani[/caption]


Phew! I never realised it was such a long process. But the efforts did pay off. Thank you Mishmash for sharing this recipe on your blog. My family had a truly wonderful lunch today along with Papadam Thalichathu, again another recipe from the same blogger!

Mushroom Bell Pepper Stir Fry


Inspired by Magic Oven Paachakam show on Kairali TV hosted by Mrs. Lakshmi Nair (show dated 30th May 2010). She made Chicken Bell Pepper Stir Fry. I substituted chicken with mushroom (a vegetarian's best alternative to meat). The preparation is fairly simple, but what gets to me is slicing of spring onions, garlics and capsicum. I outsourced that to my cook who probably was muttering under her breath (I did not hear it, so I am okay with it).

[caption id="attachment_120" align="alignleft" width="300" caption="Not the best pic of the dish!"]Not the best pic of the dish![/caption]

Ingredients

  1. Button Mushrooms - 3 packets (not sure of the weight)

  2. Bell Peppers - 2 (I used 1 yellow as well, but the green ones are good enough)

  3. Onions - 2

  4. Spring Onions - 1 bunch (bulbs and stalks separated)

  5. Garlic - 10 cloves sliced finely

  6. Green Chilly - 2 slit finely

  7. Ginger - 1 inch piece slit into thin strips (optional - I did not use it)

  8. Soya Sauce - 2 tblsp

  9. Chilli Sauce - 1 tsp

  10. Salt - to taste

  11. Pepper - 2 tsp

  12. Cornflour - 1 cup

  13. Oil - 5 tblsp


Method

  1. Slice mushrooms into 2. Soak in hot water for 15 minutes.

  2. Marinate with salt and pepper and set aside for 30 minutes.

  3. Roll them into cornflour and set aside. (I was lazy to roll each one, so I just mixed it all. Not sure how different the taste would be had I rolled it)

  4. Heat oil in a wok.

  5. Fry chilly and garlic till brown.

  6. Add the mushroom and stir fry.

  7. Add soya sauce and chilly sauce.

  8. Fry till mushrooms are done.

  9. Add cut capsicum and toss around.

  10. Add onions, spring onions and continue frying.

  11. Add salt if required at this stage (after testing)

  12. Keep on low flame till the onions and capsicum become soft but not fully cooked.

  13. Serve.

    [caption id="attachment_119" align="alignright" width="300" caption="Mushroom Bell Pepper Stir Fry"]Mushroom Bell Pepper Stir Fry[/caption]


As I told you, the preparation is fairly simple. Peeling, slicing the onions, garlics and the spring onions was what was holding me back, but when I found a scapegoat to do that for me, I was more than willing to prepare this for lunch today.

Spanish Omelet


(Indianised to my taste obviously)

Yummy Spanish Omelet
My fascination for egg recipes knows no bounds. I always keep inventing with Omelet when we have Bread-Omelet for breakfast or whenever I order it from outside (from 5 star hotels to roadside sandwich stalls), I try to customize it. I've heard about Spanish Omelet and started hunting for the recipe online. I found some authentic recipes. I realized that hubby dear may not prefer the taste of so much of potaotes. So I Indianised my recipe. Try it out.


Ingredients (For 2 omelets)
  1. Eggs- 4
  2. Potato - 2 small
  3. Mushrooms - 5-6, chopped very finely
  4. Tomato - 1
  5. Green Chilly - 1
  6. Paparika - 1 tsp
  7. Seasoning of your choice - 2 tsp
  8. Salt to taste
  9. Olive OIl - 1 tsp per omelet
  10. Olive oil - 1 tbsp (for frying the potatoes and mushroom)

Method:
    Made my style
  1. Cut potatoes and mushroom into evenly sized small pieces
  2. Boil them (optional - I did this so that I dont have to fry it for too long in oil. If you don't boil them, you will need more oil for frying the potatoes and mushroom)
  3.  Heat olive oil in a pan.
  4. Add potatoes and mushroom and cook till dry.
  5. Add salt, required seasoning.
  6. Mash it a little.
  7. Beat 2 eggs well.
  8. Add half the green chilly and tomato cut into small pieces.
  9. Add required salt and beat well.
  10. Add half the potato and mushroom mix and beat well.
  11. Heat the pan and add 1 tsp olive oil.
  12. Add the beaten egg mix and spread evenly to make a thick mould.
  13. Reduce flame to low and cook covered with a lid.
  14. After 3 minutes, turn the omelet over (This is the difficult part, to turn it without breaking it. Cover the pan with a plate and turn it upside down, taking care not to burn your fingers. Then gently slide it back to the pan for the other side to cook.) Mine still gave away - guess it comes with loads n loads of experience.
  15. Serve with toast.

Friday, June 4, 2010

Peas-Potato Garam Masala

Its been a few days since I've posted something. That is primarily because it has been a few days since I tried preparing something. I left it to the able hands of my cook and well, she hasn't been doing a good job of it. So today, I got back to the rut and decided to invent a dish.

I was not too successful at it... Just added everything I could think of... then did some damage control...and voila... my recipe was born!!!!!

I started off, wanting to make a potato fry recipe that I read in one of the food blogs that I follow. It was fairly simple and I thought it would be an ideal accompaniment to go along with this afternoon's lunch. Then one brainwave hit another till a huge Tsunami of ideas struck. And thus the recipe was born.

Ingredients:

  1. Potatoes - 3

  2. Peas - 2 cups

  3. Shallots - 10-15

  4. Green Chilly - 2-3

  5. Garlic - 5-6 cloves

  6. Ginger - 1 inch piece

  7. Cashew - 3 tblsp

  8. Tomato puree - 5 tblsp

  9. Hung Curd - 1/2 cup

  10. Cream - 3-4 tblsp

  11. Kasuri Methi - 2 tblsp

  12. Amchur Powder - 1 tsp

  13. Turmeric Powder - 1/4 tsp

  14. Salt to taste

  15. Oil - 2 tblsp

  16. Jeera - 1 tsp

  17. Bay Leaf

  18. Cloves - 3-4

  19. Green Cardamom - 2-3

  20. Black Cardamom - 2

  21. Star Anise - 1

  22. Nutmeg - 1/4

  23. Nutmace - 1

  24. Khus Khus - 1-2 tsp

  25. Saunf - 1 tsp


Method:


  1. Boil potatoes and peel. Cube them and set aside

  2. Thaw peas if frozen. Else boil them with potatoes.

  3. Grind the sallots, chillies, ginger and garlic to a fine paste.

  4. Roast items 17-25 on an iron skillet and dry grind them

  5. Soak cashews in warm water and make cashew paste.

  6. Beat the curd well, mix the dry garam masala in the curd and set aside.

  7. Mix cashew paste to this mixture.

  8. Heat oil in a pan.

  9. Splutter jeera and add the bay leaf.

  10. Add the onion paste and fry till raw smell disappears.

  11. Add tomato puree and fry well.

  12. Add the curd/cashew/garam masala mixture and cook till it becomes thick and dry.

  13. Add turmeric, salt and amchur powder.

  14. Add kasuri methi and mix well.

  15. Add water and let it boil.

  16. Add the potatoes and peas and cover with a lid.

  17. Allow to cook for 5-10 mins.

  18. Add cream and remove from fire.


[caption id="attachment_108" align="alignright" width="300" caption="Peas n Potato Garam Masala"]Peas n Potato Garam Masala[/caption]

This can be had with roti's or mixed with rice. You could alter the taste by adding tamaring/more tomato puree or reducing the quantity of garam masala. Since this dish is laden with garam masala, if you mix it with rice, it tastes like pulao/biryani.


[caption id="attachment_109" align="alignleft" width="300" caption="Mixed with rice"]Mixed with rice[/caption]

Share It

LinkWithin

Related Posts with Thumbnails